Hyperion Financial Management
Introduction
One of the data-sources for the CXO-Cockpit is Oracle Hyperion Financial Management (HFM). Data and meta-data from an HFM application can be extracted, transformed and loaded into the CXO-Cockpit multi-dimensional OLAP database. This article describes the components and processes involved. We support any HFM version from HFM 4.0 up to Oracle EPM 11.1.2.3. Here we describe the integration for the versions 11.1.2.1 and earlier. For HFM versions 11.1.2.2 and 11.1.2.3 the maintenance of the Integration will be described elsewhere.
We offer two methods of data-synchronization:
- Data extractions using Extended Analytics. This method will be used for loading bulk data, either as an action initiated by the Administrator or via a scheduled batch;
- Real time synchronization. This enables automatic refreshing of data for an Incremental Load Set.
Both synchronization types are handled by the Agent Service.
System Configuration
The picture below gives an overview of the required system-configuration for the synchronization between HFM and the CXO-Cockpit.
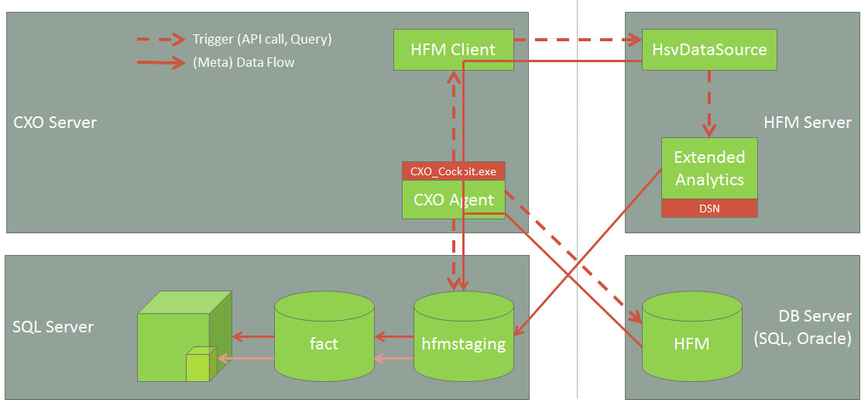
CXO Server: Here the HFM Windows Client, the ETL tool (CXO_Cockpit.exe) and the Agent (formerly called 'HFM Extraction Service') must be installed
Microsoft SQL Server: Apart from the cxo_hfmstaging_... database, in this layer we also have the cxo_fact_... and cxo_repository_... databases. In some configurations the OLAP db is stored on a separate Analysis server. In a single-server setup, the database-layer is combined with the CXO-Cockpit application server layer (II)
HFM Application Server: This can be a single server or a cluster of multiple servers
HFM Database: In some configurations, this is combined with the SQL Server database layer of the CXO-Cockpit (III).
The arrows represent the processes related to data or meta-data extraction:
- The command for starting data or meta-data extraction is invoked from the Design Studio by putting appropriate flags in the hfmstaging database
- The flags are picked up by the HFM Extraction Service and are updated where relevant
- If the flag indicates a (meta-)data extraction, the ETL tool (CXO_Cockpit.exe) is called with the right arguments
- The ETL tool uses HFM Windows Client components for all HFM related actions
- The HFM Client connects to the HFM Application Server, starts Extended Analytics and passes part of the results back to the ETL tool.
- The ETL tool reads the extraction-specifications (dimension-detail etc.) from the hfmstaging database. Further, part of the meta-data retrieved from HFM are stored in this database. Finally, at the end of the extraction a series of SQL scripts is started to process the raw data and make it ready for analysis
- Data extraction using Extended Analytics is an asynchronous process. The data is not passed back to the ETL tool, but directly stored in the hfmstaging database (through a registered DSN on the HFM application servers)
- One of the flags in the hfmstaging database picked up by the HFM Extraction Service can indicate a request to process the OLAP database (whenever the request has been done, it will only be effectuated after finishing the extraction process)
- Apart from data-extraction with Extended Analytics (involving the ETL tool, the HFM Client and the HFM Application servers) it is also possible to set-up a direct link to the underlying HFM database. This enables a real-time synchronization of one Scenario / Year combination.
Configure and start the Agent Service
To extract data or meta-data from HFM, we must make sure that the Agent Service is able to handle requests from the user. Use the Configurator to copy the Connection String from the Design Studio configuration file to the .config of the Agent Service.
Integrate with HFM
This section describes the steps to setup the connection to HFM and retrieve the meta-data from the HFM application into the CXO-Cockpit databases. It is assumed that we have created a CXO-Cockpit application called 'comma' which will connect to an HFM application called 'COMMA931' (an application for a virtual company).
To maintain the Integration, start the Integration Adapter comma:
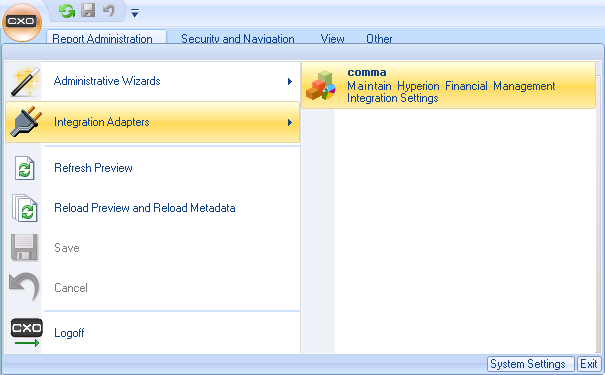
The Integration Settings window will open with the General Info tab, where the integration details must be specified:
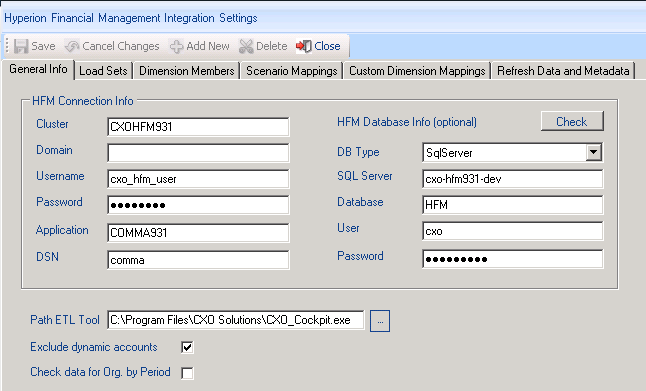
- Cluster: Enter here the name of the HFM cluster registered on the CXO-Cockpit application server. Registering the cluster can be done with the HFM Windows Client that must be installed on the CXO-Cockpit server. Note that the cluster-name is not (always) equal to the name of the HFM Application Server. Ask your HFM Administrator for further details.
- Domain: It is strongly advised to use a native HFM user for connecting (log-on) to HFM. Therefore, this field can be left empty in most of the installations.
- Username: Enter here the native HFM user that will be used to log-on to HFM. This user should meet the following three requirements:
- It must be provided (have access to) the HFM application that will be used;
- Within this application it must be able to read all meta-data and data. To read all (to be selected) data, make sure that this is warranted by the role of the user and that all necessary Security Classes are assigned to the user;
- It must be able to run Extended Analytics.
If these requirements are not met, extractions will fail.
- Password: Enter the password of the HFM user. This password will be stored in the CXO-Cockpit database with a highly secure encryption. Should the password change, then it must be re-entered and saved.
- Application: The name of the HFM application that will be used for extraction of data.
- DSN: Enter the name of the DSN (Data Source Name) that will be used for feeding the extracted data into the correct CXO-Cockpit database. Entering and registering a DSN must be done on all HFM Application Servers that are part of the Cluster.
- HFM Database Info (optional): This section can be left empty if only the standard extraction method (using Extended Analytics) will be used. It should be filled for the Real Time synchronization method. Enter connection details for SQL Server instance where the HFM Relational Database is stored. Currently 2 SQL Server types are supported: Microsoft SQL Server 2005+ and Oracle 9+. Read more: Configure HFM Database access.
- Path ETL Tool: The actual data and meta-data extraction using Extended Analytics is done by the ETL Tool (CXO_Cockpit.exe). This tool is not installed via the CXO-Cockpit installer and must be copied to a certain location, usually ..\Program Files\CXO Solutions\. Here you can enter the path where this tool can be found.
- Exclude dynamic accounts: One of the options for Extended Analytics is to exclude the extraction of dynamic accounts (accounts defined in HFM with the DYNAMIC attribute). Dynamic accounts can be based on complex calculations which may involve multiple sub-cubes. Extracting this type of accounts can sometimes be very time-consuming and can cause a serious performance drop on the HFM Application servers. Unless you absolutely need dynamic accounts, it is advisable to tick this exclude checkbox. Note that we offer a powerful and easy-to-use method to define dynamic accounts within the CXO-Cockpit Design Studio (Cube Calculations).
- Check data for Org. by Period: Check this box if the HFM application is based on Organization by Period. Note that this option may slow down the performance of the data-transformation process.
Extract Meta Data
When all specifications are entered correctly you can extract Meta Data from the HFM application. These Meta Data can then be used to specify the level of detail you want to have in your data-extract (and, hence, in the CXO-Cockpit application). A Meta Data extraction must be repeated each time you want to include dimension-members (new Entities, Accounts, etc.) that have been added to HFM into your CXO-Cockpit application.
To start a Meta Data extraction, open the last Tab of the Integration Settings (Refresh Data and Metadata). Make sure that you select the option 'Metadata' and then press the button 'Start Extraction':
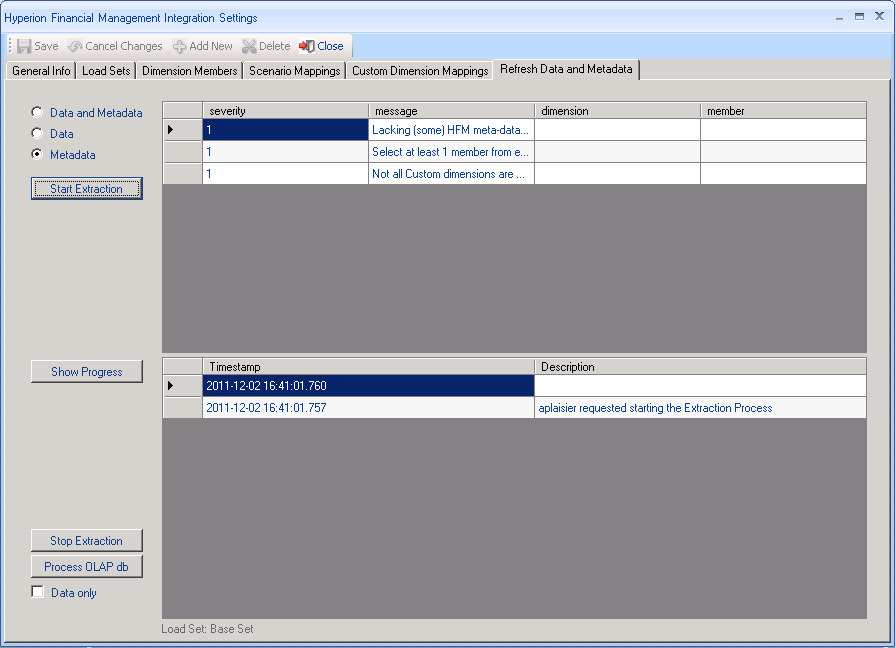
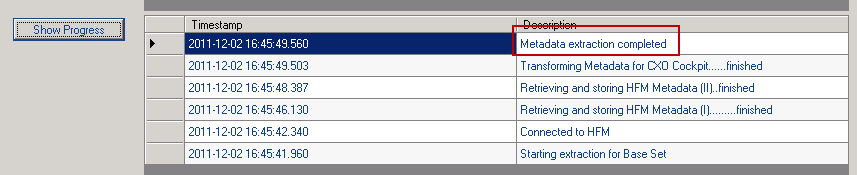
A message appears which indicates that the request has been posted. After a few seconds, the HFM Extraction Service will pick-up this request and starts the actual extraction. You can monitor the extraction by repeatedly pressing the button 'Show Progress':

The Meta Data extraction successfully finished if you see the message:
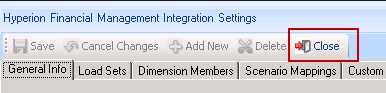
If the HFM Integration was not properly specified, then you may see error-messages in the progress panel. Read more for an overview of these messages. To be able to work with the extracted Meta Data, close the Integration Settings window and re-open it:
Prepare Data Extraction
Data extraction involves the specification of the level of detail of the data we want to extract from HFM and the mapping of the HFM dimensions onto the CXO-Cockpit dimension model.
The level of detail is determined by explicitly selecting the dimension-members you want to include in the extract. The combination of these dimension-selections is organized in Load Sets and Subsets.
Load Sets and Subsets
The 2nd Tab of the Integration Settings window shows the defined Load Sets and Subsets. For a new application, we always start with one Load Set (called Base Set) with one Subset (called Base).
The Base Set (or actually the first Load Set in the list) is always used to do a full data-extraction: all current data in the CXO-Cockpit fact database are deleted and re-filled with the new extract. Also all CXO-Cockpit dimensions are completely rebuilt.
Any additional Load Set in the list (which usually have names like 'CurrentAct', 'NYBudget') acts as an Incremental Load Set: only a restricted slice of the CXO-Cockpit fact database is replaced by new data from HFM. The CXO-Cockpit dimensions are not rebuilt.
The Base Set can be split into Subsets. Subsets differ in their selection from the Scenario, Year and Period dimension. By using Subsets we can ensure that only relevant combinations are being extracted: e.g., for the Actuals we want data for a couple of years, while the Budget is only relevant for the current year and the previous year.
The difference between an Incremental Load Set (all Load Sets except for the first) and a Subset:
- A Subset is not a standalone extraction unit, but one of the steps in a full extraction. If you select the Base Set and then start an extraction, all Subsets will be subsequently executed.
- An Incremental Load Set is a standalone unit: if you select that Load Set and then start the extraction, only that unit will be executed.
The following examples show the specification of a Load Set with several Subsets.
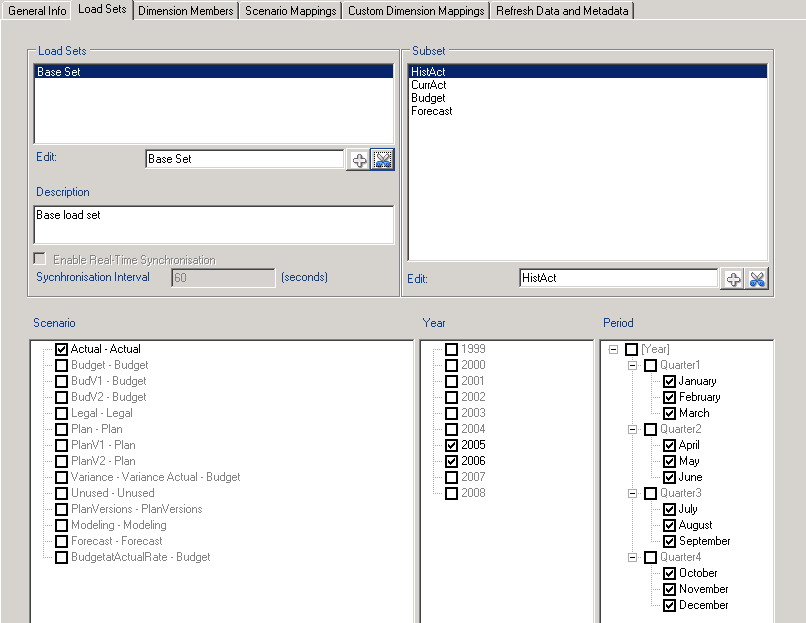
The first Subset is called 'HistAct' (to rename a Subset, change the name in the Edit window and press the Save button). This Subset encompasses the Scenario Actual for all months in the years 2005 and 2006.
Note that we only selected the months from the Period dimension. There is no need to also select the Quarters and the Year level because these are calculated in the CXO-Cockpit OLAP database.
The next Subset ('CurrAct') again only contains the Scenario Actual, but now for the current reporting year (2007) and until the current reporting period (March):
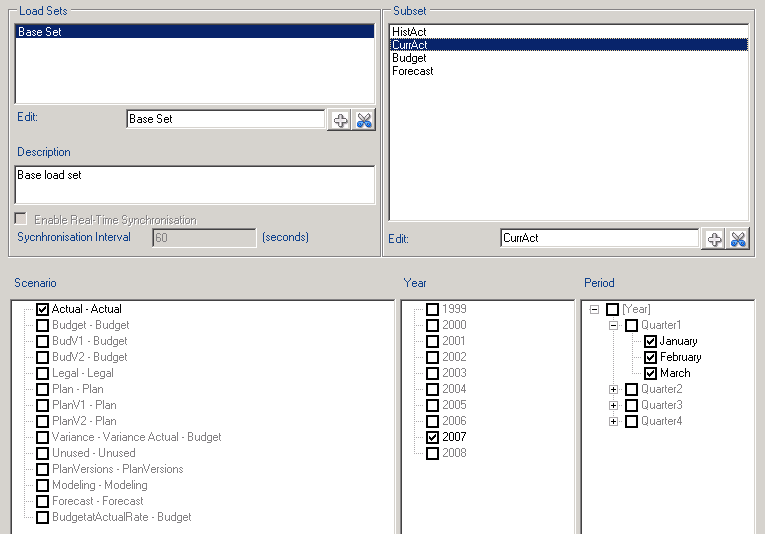
Creating this separate Subset makes sense: if we include the year 2007 in the first Subset then we would also extract data for the months April - December 2007 and these periods are not yet available or closed in HFM. You can create a new Subset by pressing the + button in the Subset panel, change the name and press Save. Also press Save after finalizing the selections of Scenario, Year and Period.
Also for the Budget we created a separate Subset:
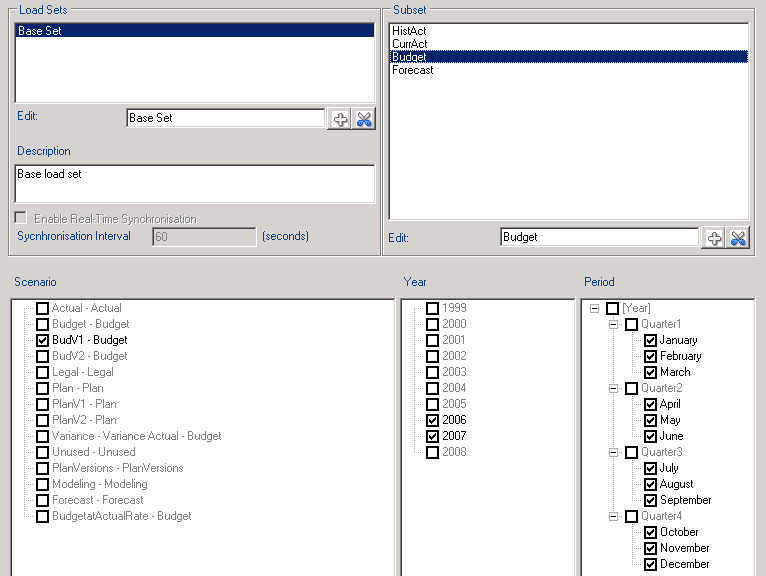
Also this Subset could not be included in the first two: for the Budget (Scenario BudV1) we want the complete year 2007 and (in view of trend-reports that go back for 12 months) also the previous year 2006.
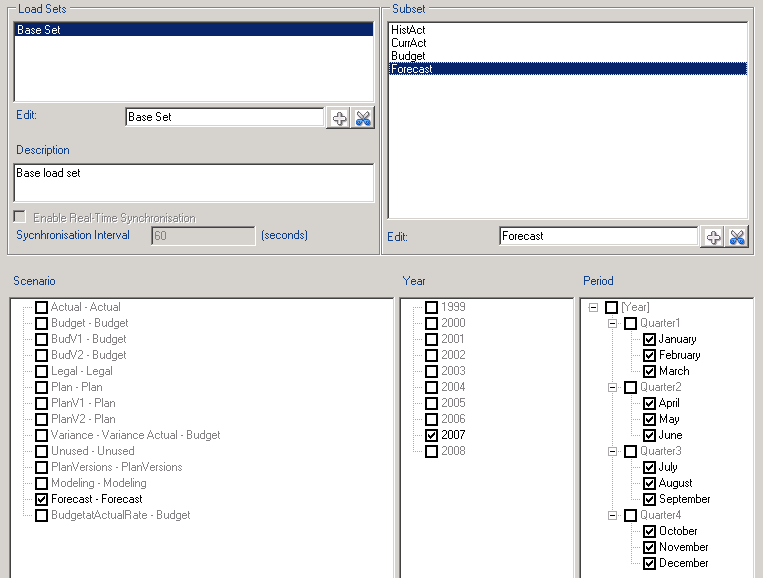
Finally, for the Forecast, we only want the entire currrent year (2007):
A shorthand way of specifying this last Subset is:
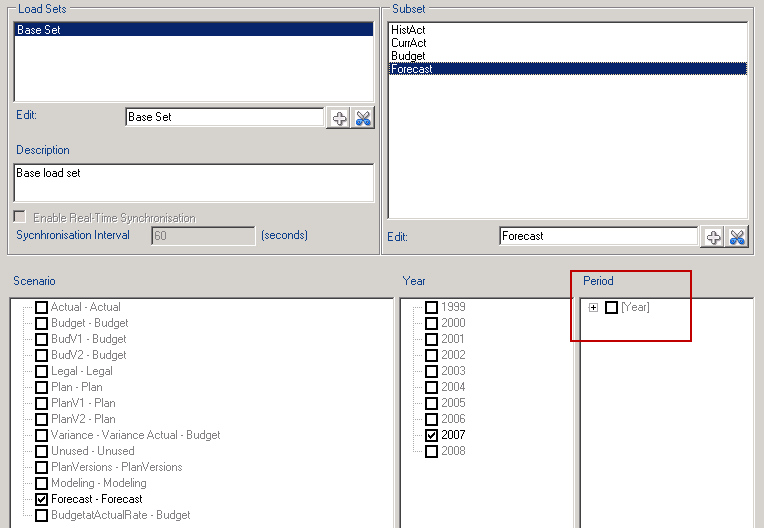
If you don't select anything in the Period dimension then the selection of the first Subset (HistAct) applies. This could also have been done for the Budget Subset.
The level of detail for the other dimensions can be specified by selecting the Dimension Members tab. Make sure that you first select the combination Base Set + first Subset (HistAct in our example).
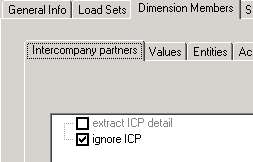
Intercompany partners (ICP)
You can decide to include Intercompany detail or to ignore it (in HFM terms this means only extract [ICP Top])
As a rule, ICP detail is ignored:
Values
It is only possible to select the Total members from the Value dimension. The most common selection is <Parent Curr Total>, <Entity Curr Total> and the application currency (USD Total in the example):
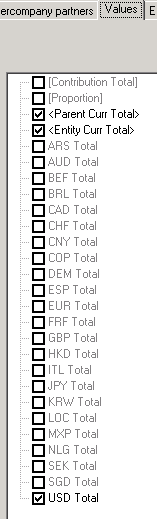
But you can also decide to only extract data in the application currency.
Note that:
- By selecting specific currencies, you will attempt to extract them for all Entities in you selection. This will only work if the HFM application all Entities are actually translated into that currency. That is done by default for the application currency (USD)
- During the extraction, the selections <Parent Curr Total> and <Entity Curr Total> are on the fly converted to real currencies (CAD, JPY, etc.)
Entities
Select all Entities you want to analyse in the CXO-Cockpit application. For example:
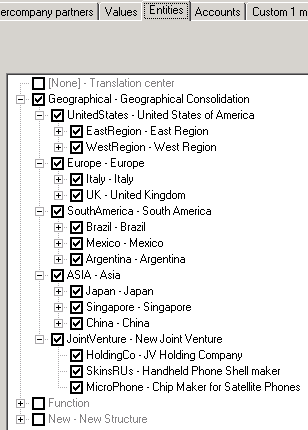
In the above example, only one entity structure has been selected. However it is perfectly valid to expand more than one structure even if this would result in selecting the same entity more than once. The only thing that has to be kept in mind is that if entities are included multiple times, this will result in a similar multiplication of the number of data-records.
The expansion and selection of Entities (and also Accounts and Custom dimensions) follows the paradigm of What you see is what you get. In the example, EastRegion is not a base-entity in HFM (the '+' indicates that we can expand further). However, in the resulting Entity dimension of the CXO-Cockpit application EastRegion will be a base-entity and it's children will be ignored.
Accounts
Also for the Account dimension you have to expand and select the nodes and members you want to include in the CXO-Cockpit application:
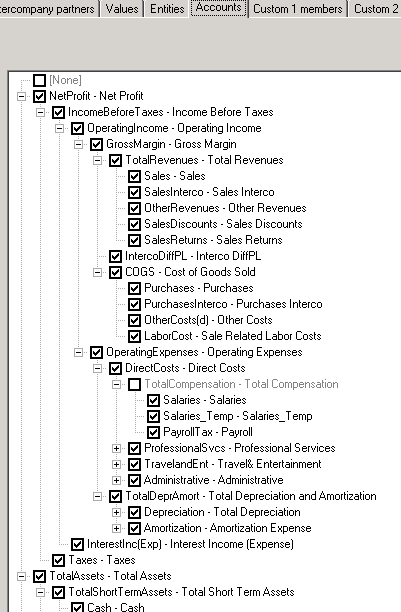
As with the Entity dimension, only the Accounts that are visible in the node-tree will be included in the Account dimension of the CXO-Cockpit. In the above example, the account Depreciation is not a base Account in HFM, but will be a base Account in the CXO-Cockpit application.
In the hierarchical dimensions (Entity, Account and Custom) it is also possible to deselect parent nodes. In the above example, we deselected TotalCompensation. That means that its children (Salaries, etc.) will become the children of the original granddparent (DirectCosts).
Unlike the Entity dimension, the actual extraction will only take place for base-members (either real base-members or parent members that are not expanded further). The values for parents are being calculated in the OLAP database of the CXO-Cockpit. In these calculations we take into account that parents and children may differ according to their type: e.g., if a Cost Account is a child of a Revenue Account, we will subtract it's value instead of adding up.
The fact that we only extract base accounts and re-calculate the parents implies that we should never skip siblings (unless we are sure that we never will use the parents in a report or if the parent is a GroupLabel Account). In other words a selection like:
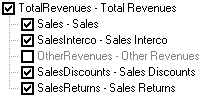
is dangerous, because not only will the Account OtherRevenues be removed from the CXO-Cockpit Account dimension, but it will also be skipped in calculating TotalRevenues as the aggregation of the underlying Accounts. This may lead to data-mismatches.
Another rule is that if parent Accounts are being expanded in one part of the hierarchy, then it should be completely collapsed in an other part where it is used as a shared member:
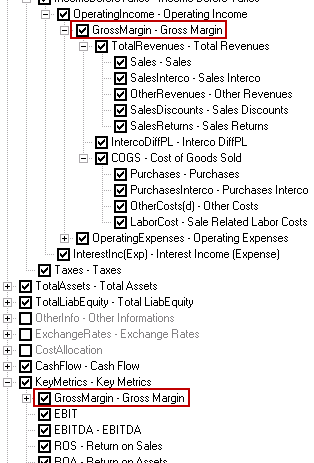
In this example, GrossMargin is expanded in the Profit sub-hierarchy, but it is collapsed where it is a shared member under the KeyMetrics node. In the CXO-Cockpit application, the shared parent account will be renamed into CXO_GrossMargin.
Custom Dimensions: Mapping and Selection
Concerning the Custom Dimensions (1 - 4) there are two highly interrelated activities to be done:
- Expanding the hierarchies and selecting members according to the level of detail you want in the CXO-Cockpit application. This is similar to the Account Dimension (but with a few exceptions we will discuss below).
- Mapping the Custom dimensions to the CXO-Cockpit Analytical Dimensions
The usual lay-out of a Custom dimension is:
On the root level we have the None member (where the amounts are booked for all Accounts that have no breakdown by this dimension) and the TotalCustom level.
On the second level (below Total Custom) we have - again - the None member and a couple of other nodes. These nodes normally represent the 'real' (tangible) dimensions like Product, Customer, Channel, Movements, etc. In this setup, the Total level will always contain valid amounts, both for Accounts with a breakdown by this dimension (or one of the nodes) and those without a breakdown.
the HFM Custom dimensions must be mapped to CXO-Cockpit Analytical Dimensions.
For Custom dimensions with a lay-out like in the above example, there are 2 mapping options:
- Mapping the Total level to a CXO-Cockpit Analytical Dimension: this could be done if either the total level is a tangible dimension or if the number of 2nd level nodes is too high to be mapped individually
- Mapping the tangible dimensions from the 2nd level. This in fact means splitting the Custom dimension into more than one Analytical Dimensions. Note that this is no longer possible when integrating with FM versions 11.1.2.2 or higher. Hence, don't use this method if you plan a migration to these versions.
For Custom dimensions with a more complex lay-out it is also possible to simply map the complete Custom dimension to one of the Analytical Dimensions
The process of mapping and selection will be explained in depth with the example of the Comma sample application.
Mapping the root-node
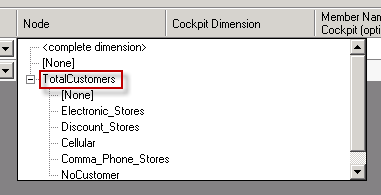
The following screenshot of the Design Studio shows the member-selection for the Custom 2 dimension:
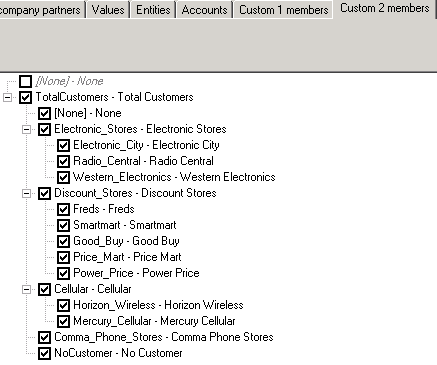
The Total Custom level is called TotalCustomers here. This already makes clear that the entire dimension is about Customers. Therefore, we create the following mapping:
- Go to the tab Custom Dimension Mappings
- In the Custom Dimension column, select 2 (from Custom 2)
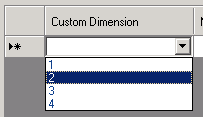
- In the Node column, select the root node:
- In the Cockpit Dimension column, enter the name of the dimension. You can choose your own name here. This is the name that will be displayed in the CXO-Cockpit application:
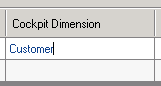 (press Enter after entering the name)
 - Ignore all other columns (= accept the defaults) and press Save. Now the mapping looks like:

Some important characteristics of a Root level mapping are:
- The Total Custom level is mapped to a CXO-Cockpit Analytical dimension that can get any name.
- In the Dimension Member selection, at least the root node should be selected
- If you expand the root node, you should make sure that all nodes (or base members) are included that roll-up in the root node. Members or nodes that do not roll-up (in HFM terms: have an aggregation weight of 0) can be recognized by the _Italic_font-type. You are free to include or ignore them.
- Like with Accounts, make sure that you always select aggregating siblings (members which are not shown in italics) under an expanded parent
- Don't select the [None] member at the root level, unless this is the only member (empty Custom dimension). In the latter case, the [None] member should be mapped to a dummy Analytical (use name 'Dummy 1' etc.).
Mapping the 2nd level
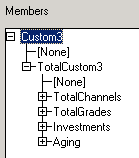
The following example shows the member-selection from the Custom 3 dimension:
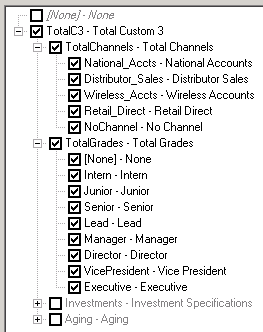
We selected all details from the TotalChannels and the TotalGrades sub-nodes, but we did not select Investments and Aging. This member selection is linked to the following mappings for this Custom 3 dimension:

This is an example where we split one Custom dimension into more than one Analytical Dimension.
Some important characteristics and rules for 2nd Level mappings are:
- A (parent-)node from the 2nd level (the level below the root) is mapped to a CXO-Cockpit Analytical Dimension that can be given any name
- This can be done for more than 1 node, leading to a split of the Custom dimension into more Analytical Dimensions
- It is possible to keep 2nd level nodes unselected and collapsed (even aggregating - non-italic - nodes). For Accounts that have a breakdown specifically for these ignored nodes, we will extract the amounts on the Total Custom level
- For all other levels, the same rule apply as for Accounts: all aggregating siblings under a parent node should be selected, because within the CXO-Cockpit OLAP database parent nodes are always re-calculated
- Also the root-node should be selected (Total Custom)
Note that 2nd level mapping only works if the Custom#TopMember properties of the (base) accounts is specific enough.
For example, if you have an account called 'Sales' which should be analyzed by Channel, then you must check if the Custom#TopMember of this account is equal to the Channel node or one of it's descendants. However, if the Custom#TopMember is on TotalCustom level, then 2nd level mapping should not be used, but Root Level mapping or <complete dimension> mapping (see below).
Mapping the Custom Dimension 'as is'
For more complex Custom Dimensions, especially those that have more nodes on the root level (not only [None] and TotalCustom) from which you would like to select members, then you can map the Custom Dimension 'as is'. The structure is then exactly the same as in the FM application except:
- we only take into account the selected members
- non-aggrgating members (those with an AggrgationWeight of 0, shown as italic in the Dimension Members section) are collected under a special parent node 'non_aggregating_members' in the Analytical Dimension
Both points also apply to the other methods of mapping.
To apply this mapping, choose '<complete dimension>' in the Node column, enter a name under Cockpit Dimension that comes closest to the content of the Custom Dimension and press Save (ignore the other columns of the Mapping table).
Technical Dimension Name
The Technical Dimension Name column of the Custom Dimension mapping grid is not editable and should be interpreted as follows:
- The first created mapping (no matter from which Custom dimension) will use dimension A01, the second mapping A02, etc.
- There are 2 exceptions: if you explicitly enter the word 'Flow' in the Cockpit Dimension column then the Technical Dimension Name will become FLO. If you enter 'GAAP' the Technical Dimension Name will become 'GAP'.
- A01, A02, A03, A04, A05 and A06 are the 6 free Analytical Dimensions in the CXO-Cockpit OLAP Database. GAP and FLO have the same dimension structure as these free dimensions but can be used specifically for Gaap/IFRS/etc. and Balance movements respectively.
Throughout the CXO-Cockpit application we will work as much as possible with the friendly names of the Cockpit Dimensions ('Product', 'Channel'), but on some places (especially when creating Cube-clutlaitons and MDX lists) it's important to also know their technical equivalents.
Scenario Mapping
A HFM Scenario often combines information about the Category (Actual, Budget), the Rate (Actual Rate, Previous year Rate, ...) and the Version (for Forecasts: V1, V2, ...).
Therefore, each of the selected Scenarios must be mapped to a member from the Categry, Rate and Version dimension.
You can define these members yourself. For example for the Category Dimension:

The Rate dimension:

and the Version dimension:

With these members, the mapping could look like:
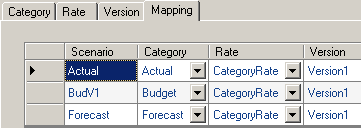
Note that:
- You are not obliged to split the Scenario Dimension. You could also create Category members with exactly the same names as the selected Scenarios. The Rate and Version dimension can then be ignored by selecting a default value there (e.g. DefaultRate, NA).
- After creating the last mapping, press Enter in the cell and click with your mouse in another row. Then press Save.
Starting Data Extraction as a Batch Process
It is possible to run the data extraction as a batch process. To do this you have to create a batch file with the following content:
"C:\Program Files\CXO Solutions\CXO-Cockpit\Design Studio\CXO.Cockpit.Administration.exe" /HFM /APP:Prod /SRC:1 "/LS_NAME:Base Set" /PC:Y <span id="fck_dom_range_temp_1328173187591_411" />
Meaning of the arguments:
"C:\.....\CXO.Cockpit.Administration.exe": the location of the Executable of the Design Studio. Check this on your own system.
/HFM - a flag indicating that we extract from Oracle Hyperion Financial Management
/APP - the name of the CXO-Cockpit application (see Login screen of the Design Studio) (put the argument between "" if there are spaces in the application name)
/SRC - the source system. This is usually 1. If we have a multi-source CXO-Cockpit application, you should ask the Administrator to lookup the correct ID of the source-system from table source_system of the repository database (field ss_id).
/LS_NAME - the name of the Load Set (check the name in the Load Sets tab of the Integration Settings). You can enter here the name of the base set (for full data extraction) and an incremental set. Use "" around the argument (see example) if there are spaces in the name of the load set.
/PC - set this to Y if you want to process the OLAP database after finishing the extraction. For a full data extract you typically set Y. If you run several incremental sets (just copy the command line and replace the load set name), then it is more efficient to only use Y in the second (or last) line. Put N otherwise.
You can schedule the execution of a batch with the Scheduled Tasks option of the Windows Control Panel (or Administrative Tools in W2008). Consult your IT department for this.
Installation Prerequisites
You can find the Installation Prerequisites file for Hyperion Financial Management in this article.
CONTENT